Es muy poco usual que los magos revelen sus trucos pues entre otras cosas algunos de de ellos fuera de la chistera pueden ser una dura decepción para el espectador.
Dicho esto, en esta entrada vamos a realizar un truco que nos puede salvar en algún momento por la falta de recursos. Pero tranquilo pues a diferencia de los magos, veremos paso a paso como sale el conejo de la chistera.
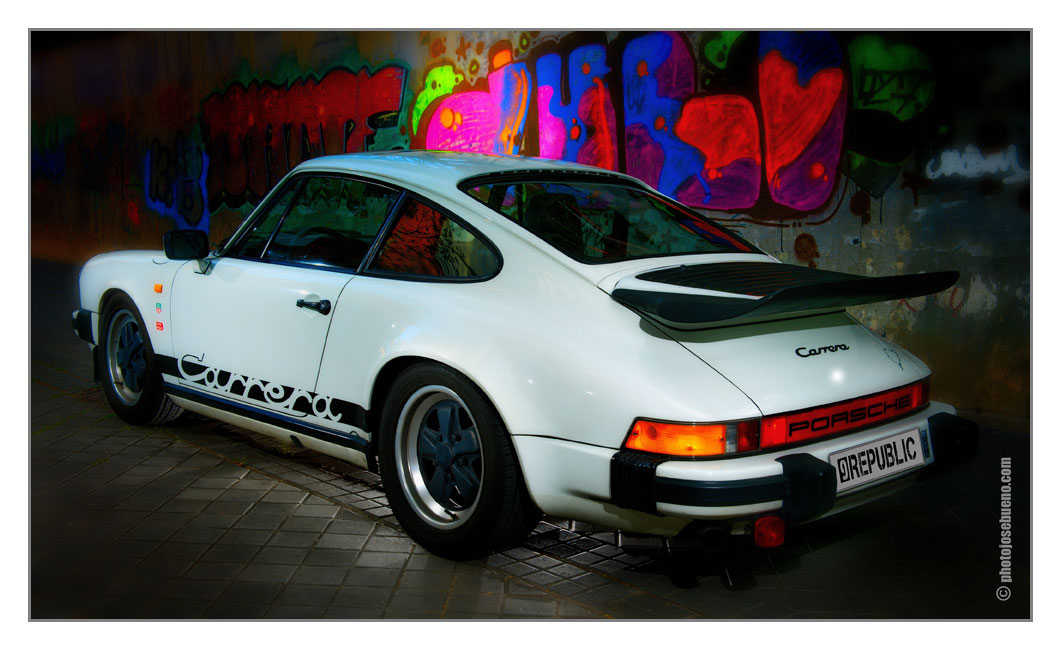
En esta ocasión, nuestro cliente ha solicitado una imagen de un coche con un fondo de grafittis pero con una iluminación especial en la que hay que utilizar varios flashes con todo lo que implica, me refiero a que además de los flashes vamos a necesitar varias unidades remotas, varios pies etc., etc.
Eso se traduce en una inversión importante para muchos bolsillos. Desgraciadamente para este trabajo solo contamos con un flash operativo, por lo que tenemos que resolver el tema sacando la magia de nuestra maleta fotográfica.
Lo primero que haremos es un esquema de la iluminación solicitada:
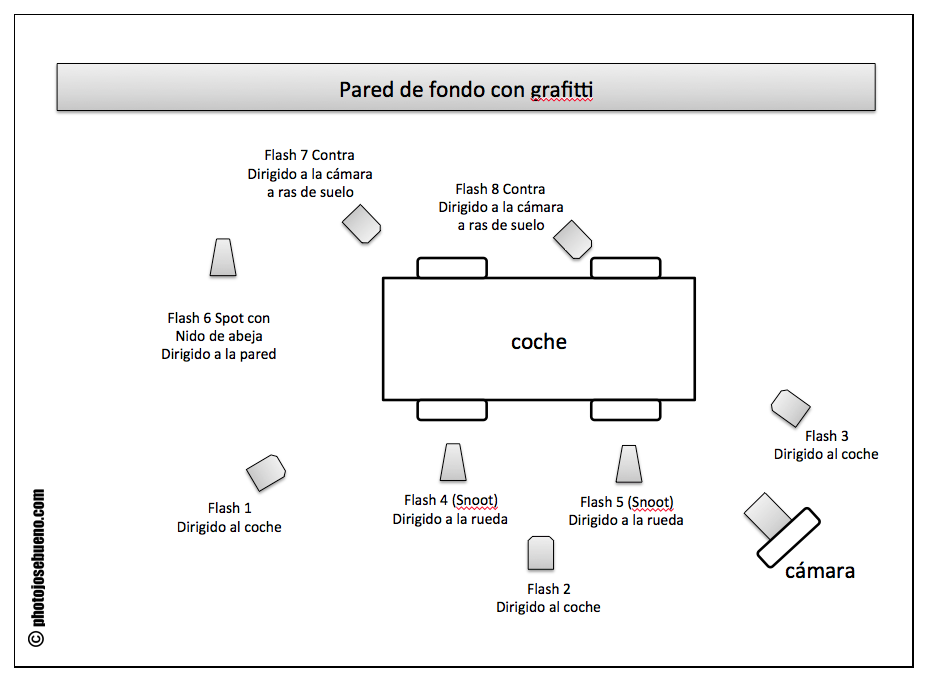
Si no hemos contado mal necesitamos nada más y nada menos que 8 unidades de luz (flashes, trípodes, snoot, nidos de abeja, etc.):
- 3 Dirigidos al coche. Uno en la parte delantera otro en el medio y otro en la trasera.
- 2 Snoot con nido de abeja dirigidos a las ruedas.
- 1 Spot con nido de abeja dirigido a la pared para iluminar el grafitti.
- 2 Contras situados en el suelo.
Analizando el problema veremos como desafiar a las matemáticas para resolver la ecuación x=8, donde x es un solo flash.
Afortunadamente contamos con un as y es que todo lo que aparece en la imagen es estático y gracias a eso convertiremos el parámetro x en el conejo de la chistera. Sustituiremos la x incluyendo varías imágenes en el mismo fotograma, tantas como flashes necesitamos. Ello es posible en algunas cámaras de la gama profesional.
En este caso voy a utilizar la Nikon D700 que dispone de la opción “Exposición múltiple” y permite hacer hasta 10 imágenes en un solo fotograma. Es importante hacer caso a lo que dice el manual respecto al tiempo que tenemos para realizar entre foto y foto ya que en el modo por defecto es de tan solo 30 segundos y eso puede ser poco tiempo si tenemos que cambiar la potencia en la unidad del flash y otras cosas. Por ello para tener menos estrés entre foto y foto tendremos que ampliar el tiempo de reproducción y problema resuelto.
Un tema que no me ha gustado y que sería fácilmente solucionable es que este sistema no funciona cuando estás conectado a un ordenador y eso sería muy interesante pero es lo que hay.
Situado el “modelo”, un Porsche 911 Carrera 3.2 delante de su fondo, colocamos nuestra cámara en un trípode potente o resistente. En este caso además he conectado a la cámara un transceptor PocketWizard Plus III, de lo mejor que he probado aun no siendo TTL y otro idéntico en el flash. Este sistema no me ha fallado nunca y alcanza hasta 500 metros, muy bueno y aunque no trabaja en TTL tiene la ventaja que vale para todas las cámaras (de cualquier formato) y flashes que tengo, incluidos cabezales de estudio.
También he conectado a la cámara un disparador remoto por radio pues a pesar de contar con 2 ayudantes, en ocasiones es interesante.
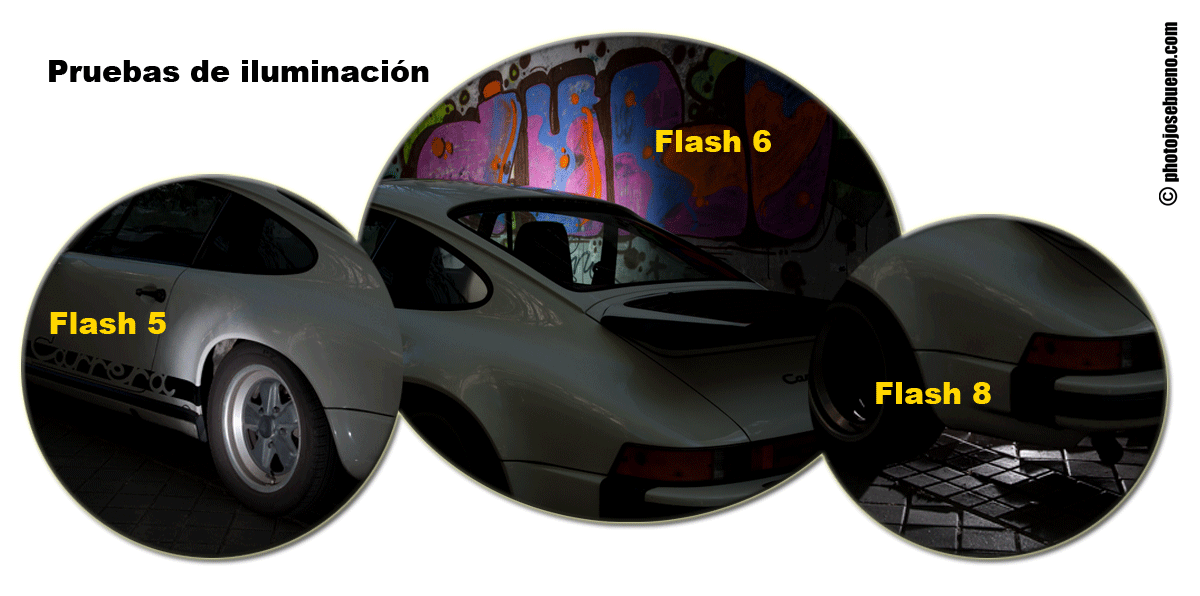
Pensaréis que era como un laboratorio de la NASA pero incluso en estudio, para este tipo de trabajos me gusta ver los resultados en una pantalla mayor a la de la cámara por lo que también conecté un portátil a la Nikon D700. Desgraciadamente y como ya he comentado antes, el ordenador solo me sirvió para las imágenes en las que controlaba la luz de cada toma, pero suficiente para ver por ejemplo que en el disparo del flash 2 del esquema dirigido al coche, se colaba la ventana softbox en la ventanilla, por lo que la decisión fue acotar la luz hacia abajo y sin dicha ventana.
Con todo preparado, con la notas de cada uno de los disparos, potencia, tipo de flash (Snoot, spot, directo, etc. ), posición y el lugar donde había que dirigir el disparo, comenzamos a realizar la imagen múltiple. Ah, se me olvidaba, dado que era a plena luz del día y el encargo tenía que simular la noche, para trabajar con 1/250 de velocidad y un f:8 de diafragma, oscurecí todo con un filtro ND variable. Creo que no hace falta decir que tanto la cámara como el flash estaban funcionando en todo momento en el modo manual.
El resultado la foto inicial, espero que esta idea te sirva si alguna vez necesitas realizar algo parecido.
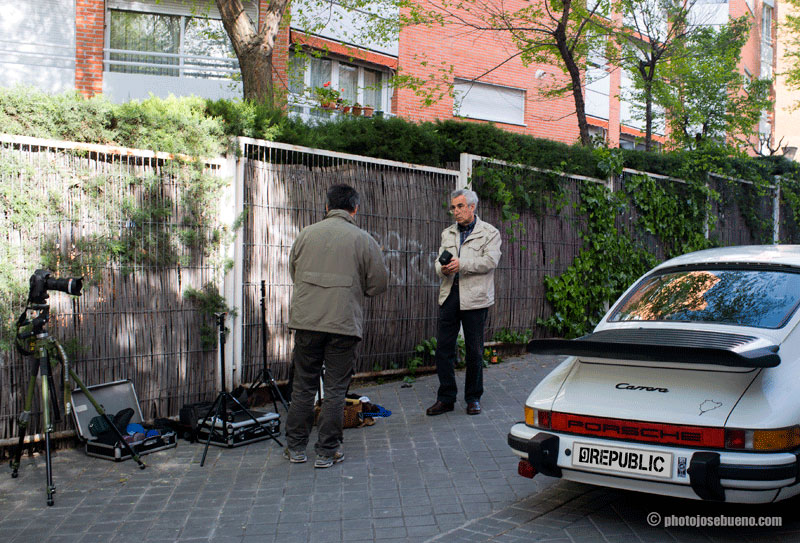
Antes de despedir esta entrada, quiero agradecer a José María y José su ayuda y colaboración.
Magic, or inventing resources …
It is very unusual that magicians reveal their tricks for among other things some of his tricks pulled from the hat can be a harsh disappointment for the viewer.
That said, in this post we will perform a trick that can save us some time by the lack of resources. But relax because unlike wizards models, see step by step how to get the rabbit out of the hat.
This time, our client asked us for a picture of a car with a background of graffiti but with special lighting in which you have to use multiple flashes with all that implies, I mean besides the flashes we need several remote units, several feet etc. etc..
That translates into a major investment for many pockets. Unfortunately for this job only have operational flash, so we have to resolve the issue by removing the magic of our suitcase photo.
First thing we do is a lighting scheme requested:
If we have not miscounted need nothing more and nothing less than 8 units of light (flashes, tripods, snoot, honeycombs, etc..:
3 Led the car. One at the front one in the middle and one at the rear.
2 Snoot with honeycomb directed to the wheels.
1 Spot with honeycomb directed to illuminate the graffiti wall.
Cons 2 located on the ground.
Analyzing the problem we will see how challenging math to solve the equation x = 8, where x is 1.
Fortunately all that appears in the image is static and because of that will convert the parameter x in the rabbit out of the hat. The x consists of including multiple images on the same frame, as many as flashes need. This is possible in some professional range cameras.
In this case I will use the Nikon D700 which has the option «Multiple Exposure» and allows up to 10 images in a single frame. It is important to listen to what the manual says about the time we have to make between shots because in the default mode is only 30 seconds and that can be just if we have to change the power on the flash unit and other things. So to have more time between shots will have to extend the playing time and ready.
One issue that I have not liked and would be easily solved is that this system does not work when connected to a PC and that would be very interesting but it is what it is.
Set the «model» in front of your background, put your camera on a tripod powerful or tough. In this case also I connected the camera a Transceiver PocketWizard Plus III, the best I’ve tasted while not identical in TTL and flash. This system has never failed me and reaches up to 500 meters, very good and although it works in TTL has the advantage that applies to all cameras and flashes that I have, including studio heads.
I have also connected the camera a radio remote trigger because despite having 2 assistants, it is sometimes interesting. You’d think it was like a NASA laboratory but also in this type of study or work, I like to see the results on screen so well connected a laptop to the camera. Unfortunately and as I said before, the computer only the images helped me in controlling light each shot, but enough to see for example that in the shot of the flash 2 led scheme to the car, the window streamed softbox so the decision was narrow light downward without window.
With everything ready, with the notes of each of the shots, type of flash power (snoot, spot, direct, etc..) And position where you had to lead the trip, we started to perform multiple image. Oh, I forgot, because it was the full light of day and the order had to simulate night to work with 1/250 speed and f: 8 diaphragm, darkened everything with an ND filter variable. I think it goes without saying that both the camera and the flash was at all times in manual.
The initial photo result, I hope that this idea will serve you if you ever need to do something.
Before you dismiss this post, I want to thank José María and José their help and cooperation.